
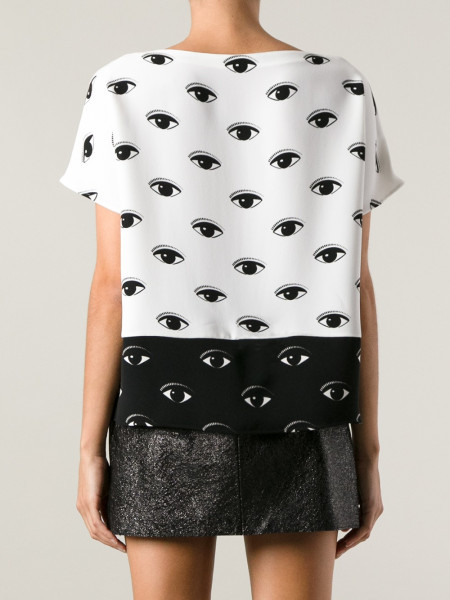
 Lately print clothing has become very trendy, but the prices for shirts like these can come in prices way above an average person's budget. I guess you could say I was inspired by the eye print shirt here on the right. (kinda..not really)
I'm going to show you guys how I made this printed eye shirt which cost close to nothing if you have these supplies already lying in your house.
Here are the Materials you will be using:
- Plastic fruit container, or any plastic packaging
- Xacto knife, or scissors( but using scissors will be a lot more difficult)
- Clear tape
- Acrylic paint
- Sponge
- Plain t-shirt
- T-shirt or extra cloth you will probably ever use again
- An Iron
- A Sharpie
- Ruler
STEP 1 : Use your Xacto/crafting knife to cut out a square from the bottom of your disposable plastic container.
The container I used belonged to a bunch of blueberries. Now that I think about it, this project is great for reusing plastic.


STEP 2 : Use a sharpie to draw a simple eye. Then use an Xacto knife to carefully cut out the shape of the eye. ***Be sure to leave some space on a part of the eye so that you don't end up cutting out a plain oval.


STEP 3 : Make sure you test your stencil with a
sharpie or marker before using it on your cloth with paint. As you can see, I just
filled in the stencil with a sharpie on notebook paper.
 |
| I made two eye stencils, one with negative space(right) and the other with positive space(left). The Positive space is better for adding dark paint onto a light color t-shirt while the negative space works best with light paint on a dark colored t-shirt. I might make a black t-shirt with white eyes, so look out in the future. |
STEP 4 : Use a ruler and sharpie to measure the spacing
you want between each eye print. Make a small dot for where each eye will be
placed.

STEP 5 : Place the stencil so that the center of the eye
is on the dot you marked with your sharpie. Then tape down the edges using
clear tape, this will minimize moving while you apply the paint.

STEP 6 : Use a small painting sponge, or a small cut up
piece of clean sponge to dab the paint on the stencil.

You can be very generous, or sparing, it's all up to you.

STEP 7 : Continue to add onto your shirt by placing the
stencil onto the next dot repeating step 6. Keep painting on more and more eyes
until all your dots have grown into cute pupils.
 |
| This looks like a mascara nightmare, but don't worry, in the end it will all pay off. |
STEP 8 : This step is optional. If you made any noticeable
paint marks that have smudged in random places, try using white paint to cover
it up. WARNING, it will not look that great, but I was desperate since my
blotches were very obvious, so be careful when you are painting your stencils in that you don't have any stray paint marks.

FINALLY!
At last your painting job is complete. BUT, don’t think you’re done. Keep
scrolling for the last few steps. Don't worry it's not as bad as you think.

STEP 9 : Iron the shirt so that the paint can “fuse” with
the fabric, use that
old t-shirt you never liked to act as a protective
barrier.

STEP 10 : AT LAST THE FINAL STEP!!!
Try on
your new custom designed shirt and style whichever way you want. If you want to
be adventurous, you can cut off the sleeves and make a tank or muscle tee.


Hope you guys enjoyed this tutorial.
Stay happy
and crafty!
~Angela
No comments:
Post a Comment