Saturday, August 30, 2014

Crafternoon#7: D.I.Y Donut Pin Cushion


Remember that easy pin cushion I did a while back? If not you can learn how to make it HERE. This time I have another D.I.Y pin cushion project, which is a bit more difficult to make but still a pretty easy D.I.Y. All you need is some basic sewing skills to make an adorable little doughnut pin cushion. If you're not much of a sewer and don't plan on using any sewing pins, you could also use this tutorial to make a cute doughnut pillow on a larger scale.
Let's get started!
As stated above, the materials you will need are:
  • Needle and Thread
  • Sewing Machine (Optional)
  • Scissors
  • Marker
  • Water bottle cap
  • Bowl
  • Felt
Additionally I forgot to mention that you will also need:
  • Stuffing
  • Scrap Fabric

Step 1. Trace 2 circles on your felt using the marker and bowl as a template.


Step 2. Use the water bottle cap as a template to trace the inner hole of the doughnut.


Step 3. Cutout the two 2D donuts and place them together with the inside of the donut facing outwards.

Step 4 Sew along the outside edges, but leave about a thumb's length of space unsewn so that you can stuff the stuffing inside later.
Step 4: Flip it inside out so that the markings are now on the inside of the doughnut, out of sight. This is what it should look like.


Step 5: Sew the inner ring of the donut. This can be done by hand or with a sewing machine. I was feeling a bit lazy so I used a machine. Sewing by hand will take longer, but will yield better results. However, before you spend time trying to make the inner part all neat and perfect, remember that there will be "frosting" to cover it up anyways.


Step 6: Stuff your Doughnut with stuffing


Step 7: Sew the remaining edges together to seal.

Step 8: Cut out a strip of colorful scrap fabric like shown below. The length should be a little more than the inner circle of the doughnut's circumference.


Step 9: Roll up the fabric and place into the center of the doughnut. fan out the wavy edges of the fabric and hand sew onto your doughnut for frosting.


Mission Complete! Now all you have to do is stick in some clothing pins for sprinkles and your doughnut is ready for sewing action.

Hope you enjoyed this tutorial.
As always, stay crafty!
~Angela

Wednesday, August 27, 2014

Back to School Composition Notebook D.I.Y


Whether or not you are attending school, this project is perfect for personalizing a generic notebook you may have lying around. The best part about this project is that it is quick, cheap, and easy to make and the end result is an adorable little notebook you can use to take notes in class or have around the home.

Today’s project is a composition notebook makeover. I personally prefer spiral notebooks when it comes to taking notes, but there is always that one class that requires you to bring a composition notebook. I had a few notebooks lying around with only a few pages used up so I thought that I would makeover and reuse them for this upcoming school year.       
I will be showing you how to make two different types of decorated Notebooks.
Hope you enjoy and let's get started!


Here are some of the things you will be needing for the first D.I.Y:
  1. An old or new composition notebook
  2. Glue: Modpodge or tackyglue ( I used tacky glue)
  3. Some pieces of Scrap book paper with a design you like
  4. scissors
  5. cup 
  6. paintbrush
  7. pencil/sharpie/pen/marker for decoration
  8. ruler
  9. tape: I used black plumber's tape 
Step 1.  Dip your paintbrush into your glue and paint onto the front of your composition notebook. Fully coat the cover of your notebook with a thin layer of glue. * In my picture there is too much glue in one spot. To get the best results try to keep the glue evenly spreaded out. Remember that you won’t need a huge amount of glue to get your paper to stay attatched.

* In my picture there is too much glue in one spot. To get the best results try to keep the glue evenly spreaded out. Remember that you won’t need a huge amount of glue to get your paper to stay attatched.
 Step 2. Place your scrap book paper on top of your notebook with glue. Leave some of your paper sticking out of the notebook cover at least half an inch of extra paper should be sticking out on all sides of your notebook. Smooth out your paper then flip over your notebook to start on your next side.

 This is what it should look like flipped around. 
Step 3. Paint glue onto the backside of your notebook as you did for cover: thin and evenly spread.


Step 4. Wrap your remaining scrapbook paper around the binding or your notebook, then smooth it onto the backside.
Step 5. Use another piece of scrap book paper to finish covering the backside or your notebook.
One piece of scrap book paper won’t be enough to cover your whole entire notebook so you can use another piece of the same design of a combination of another design.
Step 6.  Trim off any excess paper that sticks out more than half an inch.

 This is what it should look like so far. You can smooth out any bumps at this point.
Step 7. Open your notebook to the front page and cut the scrap book paper according to the red dotted lines in the picture below.


Step 8.  Fold in the edges of your paper and paste into your note book like shown below:

Step 9. Take a Strip of Scrap book paper and flip it over so that the white side is showing. Glue the paper onto your notebook. This is up to you and how you want your notebook to look. I decided to paste on my strip of paper diagonally.
Step 10. Trim your strip of paper so  that if fits your notebook or tuck it in and glue it for a cleaner look. 
Step 11. Take your ruler and pencil and draw a straight line down your strip of paper. Afterwards, go over with a permanent marker or pen. This is where you will be writing your notebook subject, so make sure to leave some space for words.
 I couldn't find a ruler so I used the straight edge of a paint stick.

Step 12. Add on any extra embellishments or decorations if you want to. I decided to just keep it simple and clean looking because it was easier and in my opinion, looked nicer as it was.
 Step13. Take your tape and stick it where the binding of the composition notebook would originally be.
Step 14. Trim off the excess edges of tape and now you have a functional notebook spine.

Now you are finished with your notebook. Yay! All you have to do now is write down the class you are taking or what things you will be writing about on your cover page.

This next Note book D.I.Y is extremely similar to the first one. Just follow along the same steps of pasting your sheet of scrapbook paper onto your notebook. 
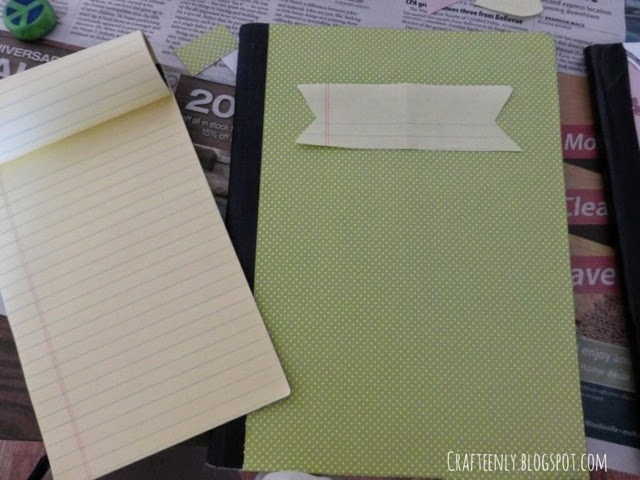
For the cover, I took some yellow note taking paper and cut it out into the shape of a decorative flag/ribbon then pasted it onto the cover.
The next step is to outline with a sharpie and add any extra embellishments of your choice.
I think that it looks nice with just the outline and I kind of regret adding extra decorations with the sharpie, but it still looks pretty cute and I am proud of my creations.

Hope you guys try this project of personalizing your notebooks and enjoy the last days of summer while you can!


~Angela


Saturday, August 23, 2014

Crafternoon#6: D.I.Y Mini Pom Pom Bunting

Its Saturday again which means it’s time for another D.I.Y crafternoon! This Crafternoon’s project is mini pompom bunting, it’s another short and simple D.I.Y project that you can use to decorate a space and add some of your own personality and color.


 I was inspired by all the cute little bunting banners from etsy.com.  Although, you have to admit the things on etsy can get a little pricey. But no worries, you can make your own cute pompom bunting banners at home with just a few materials and some short simple steps.It's so easy that I bet you could make this without even following my tutorial, nevertheless, I still want to show you my process of making this.

Let’s get started!
Here are some things you will be needing:
  1. a handful of pompoms
  2. needle and thread
  3. scissors

Step 1: Thread your needle to the length you want your pompom bunting to be and tie a knot at the end.

Step 2: Stick the needle through a pompom and pull it all the way through to the other side of the thread close to where you tied your knot.
Step 3: Continue this process of adding more pompoms and spread out evenly when done by adjusting the distance between the pompoms with your hands.


Step 4: When you have evenly filled up your thread with pompoms, cut the needle off the thread and tie a knot to secure.Step 5: Hang it up with some thumbtacks or tape if you don’t want to puncture your walls.


I added my pompom bunting to my desk space to add more color and fun to an otherwise boring workspace.

I ended up with an extra blue pompom so I stuck it on top of my mini Eiffel Tower.

Work hard to inspire others.
~Angela

Thursday, August 21, 2014

Australia Vacation Pictures

Hello there people of the internet! This summer I stayed near my home because I was busy with school and volunteer work, but today I'm going to show you my vacation pictures of my trip to Australia from last year. I took huge amount of memorable photos, but I think my dad deleted a huge portion of those photos, so I'm only sharing a few with you guys so that you won't be too overloaded. 
Yes this is the famous Sydney Opera House. you can't go to Sydney and not visit this opera house. I think the first time I heard about this was from Finding Nemo.

Here are some kangaroos, because what would Australia be without kangaroos. 

This little guy is a tree kangaroo, I chose to share this picture because of the pretty lighting and because you don't see a tree kangaroo everyday especially not one as photogenic as this one.

We went on a boat to catch and eat some mud crabs and oysters. Don't worry, after washing  and cooking the crabs, there isn't any dirt or mud. At the time I remember rearranging the food and utensils to take some awesome food shots. I might of looked like a crazy person to the other passengers on the boat. just imagine a girl squatting on a chair taking numerous photos of her plate of food. 

Are these storks? They're storks right? Wait no, they're pelicans like Nigel in Finding Nemo. If you haven't seen that movie, I have no idea what you are doing with your life it is a Disney Pixar classic and you'll probably be forced to watch this movie in school at some point in life. 

Hey it's those birds again! I never thought I would see so many at once, or that they would all be coming towards me in a huge flock. 
 I was on a boat and I saw this tiki butt. Isn't it... cute?

These are some dolphins, and I think we saw them at a Sea World in Australia.

Like a bunch of tourist sites int the world, there was a huge market place. It was summertime(or their winter) and they were selling these cute costumes. 

Here is an unbelievably photogenic seagull. We were at some boat dock place if you were wondering with those boats in the background.

It's a picture of a cliff. I bet this picture would be a popular picture on pinterest  if someone was sitting near the edge of the cliff staring off into the distance where their backpacking gear beside them. 

I was at a beach in Australia and saw this guy who hopefully ended up taking some great shots.

Hope you guys had a great summer!
~Angela